
Understanding Vapor Barriers
What is a Vapor Barrier?
A vapor barrier is a material designed to resist the diffusion of moisture through walls, ceilings, and floors. Typically made of plastic or foil sheets, vapor barriers serve a critical function in maintaining a building’s integrity by preventing moisture from seeping in from the ground or outdoor environment. This is particularly vital in crawl spaces, basements, and other areas prone to dampness. By installing a vapor barrier, homeowners can significantly reduce the risk of mold growth, structural damage, and unhealthy indoor air quality.
Importance of Vapor Barrier Installation
The necessity of vapor barrier installation cannot be overstated, especially in areas with high humidity. Moisture build-up in crawl spaces can lead to a range of problems, including wood rotting, the proliferation of mold, and pest infestations. Furthermore, stagnant moisture may contribute to heightened risks of respiratory illnesses among household occupants. Thus, proactive measures through effective Vapor Barrier Installation are essential to safeguarding your home, ensuring a healthier living environment, and saving on future repair costs.
Common Materials Used in Vapor Barriers
Vapor barriers can be made from various materials, each offering different levels of efficacy. The most commonly used materials include:
- Polyethylene Sheeting: One of the most popular choices, polyethylene is durable, flexible, and available in various thicknesses. Thicker sheets provide better protection against water and vapor.
- Foil: Reflective foil barriers work by reflecting radiant heat, making them particularly effective in warmer climates while also reducing moisture ingress.
- Composite Membranes: Some barriers combine several materials, providing a more comprehensive solution by addressing multiple moisture issues.
Preparing for Vapor Barrier Installation
Assessing Crawl Space Conditions
Before embarking on the installation of a vapor barrier, it is imperative to assess the current conditions of your crawl space. Check for signs of moisture accumulation, such as standing water, dampness, or mold. Additionally, inspect the foundation for cracks or other pathways that may contribute to moisture ingress. Understanding the level of moisture and the sources is critical to adequately preparing for a successful installation.
Tools and Equipment Needed
Having the right tools and equipment can significantly streamline the implementation of your vapor barrier. Essential items include:
- Straight edge and utility knife for cutting the barrier to size
- Tape measure for accurate measurements
- Duct tape or specialized barrier tape for securing seams
- Shovel or rake for clearing debris from the crawl space
- Paint roller or sprayer for applying any sealants
- Personal protective equipment (PPE), such as gloves and masks
Safety Precautions to Consider
When dealing with crawl spaces, safety should always be a priority. Here are essential precautions to consider:
- Ensure adequate ventilation before entering the crawl space to avoid inhalation of harmful gases.
- Use proper PPE, including gloves, goggles, and masks, to protect yourself from dust, mold, and sharp objects.
- If possible, work with a buddy or have someone nearby in case of an emergency.
Step-by-Step Vapor Barrier Installation Process
Clearing the Crawl Space
The first step in the installation process is to clear out the crawl space. Remove any debris, such as old insulation, leftover building materials, or standing water, to ensure a clean foundation for the vapor barrier. This step may also involve disposing of any mold-infested materials to prevent future complications.
Measuring and Cutting the Barrier
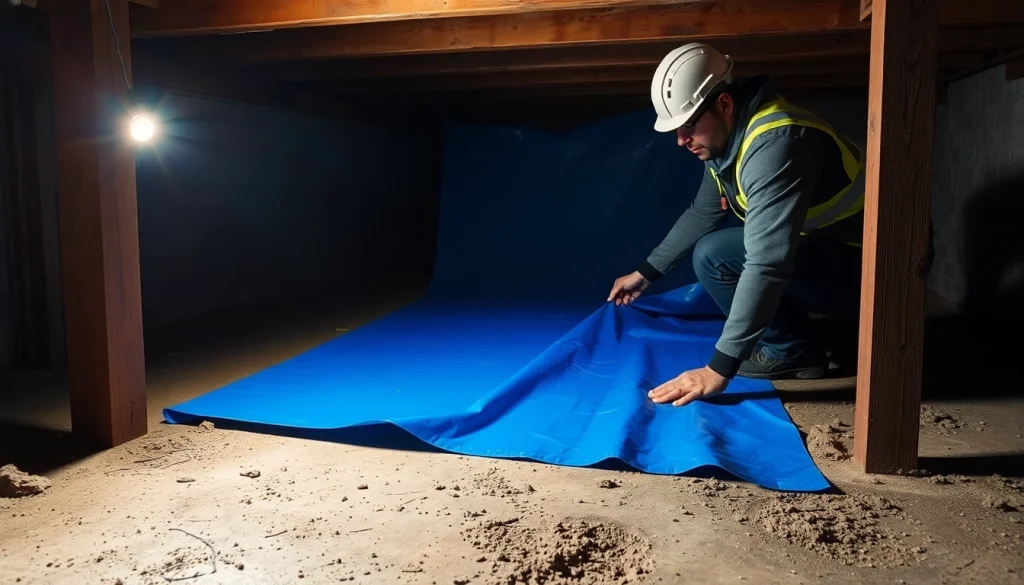
Accurate measurements are crucial. Measure the dimensions of the crawl space to determine the amount of vapor barrier material needed. Once you have your measurements, roll out the polyethylene sheeting or chosen material on level ground and cut it with a utility knife, allowing for a few extra inches on all sides to ensure complete coverage.
Sealing and Securing the Barrier
After cutting the barrier to size, begin laying it down in the crawl space. It’s essential to overlap seams by at least 12 inches for optimal effectiveness. Use duct tape or specialized barrier tape to seal all seams securely. Make sure the barrier adheres firmly to the walls and floor, tucking the edges under any walls or foundations if possible to create a continuous seal against moisture.
Maintenance and Best Practices
Regular Inspection Tips
Once your vapor barrier is installed, it’s crucial to perform routine inspections. Aim to check the installation at least twice a year. Look for signs of damage to the barrier, such as cuts or tears, and monitor moisture levels in the crawl space. Early detection of issues can help prevent more significant problems later on.
Dealing with Moisture Issues
If you encounter persistent moisture problems even after installing a vapor barrier, additional measures may be necessary. Consider installing a dehumidifier in the crawl space to regulate humidity levels. Proper drainage solutions, such as French drains or sump pumps, can also divert excess water away from the foundation, further protecting the area.
When to Replace the Vapor Barrier
A vapor barrier may need replacing if it becomes damaged or shows signs of deterioration. Typically, a well-installed vapor barrier can last several years but should be replaced if any moisture issues resurface. Factors such as environmental conditions or extreme weather can also affect the lifespan of your vapor barrier, making regular checks crucial.
FAQs about Vapor Barrier Installation
What is the best material for vapor barriers?
The best material for vapor barriers is polyethylene sheeting, particularly in thicknesses of 6 mil or greater, as it effectively resists moisture diffusion.
How much does vapor barrier installation typically cost?
The cost of vapor barrier installation varies widely but generally ranges from $1.00 to $2.50 per square foot, depending on materials and labor.
Can I install a vapor barrier myself?
Yes, many homeowners can install a vapor barrier themselves with proper tools and safety precautions, though professional assistance can ensure optimal results.
How long does a vapor barrier last?
A well-maintained vapor barrier can last anywhere from 10 to 20 years, though environmental factors may impact its durability.
Do I need a vapor barrier in every crawl space?
Not every crawl space requires a vapor barrier; however, if you live in a humid climate or have experienced moisture issues, it is highly recommended.